How to resize ACFS and change the mountpoint

关于如何创建ACFS,参看我的上一篇文章:How to create ASM filesystem(ACFS) in Oracle 11gR2

在创建完ACFS之后如果想更改挂载点(mountpoint)以及修改卷的大小,该如何操作呢?

–检查当前ACFS文件系统状态。ACFSDG是ACFS所在的磁盘组,总大小614400M,还有409491M空闲。

$ asmcmd lsdg
State    Type    Rebal  Sector  Block       AU  Total_MB  Free_MB  Req_mir_free_MB  Usable_file_MB  Offline_disks  Voting_files  Name
MOUNTED  EXTERN  N         512   4096  1048576    614400   409491                0          409491              0             N  ACFSDG/
MOUNTED  EXTERN  N         512   4096  1048576      4886     4490                0            4490              0             Y  CRSDG/
MOUNTED  EXTERN  N         512   4096  1048576    488288    90536                0           90536              0             N  DATADG/
MOUNTED  EXTERN  N         512   4096  1048576    223623   221834                0          221834              0             N  FRADG/

–检查ACFSDG上的卷(Volume)。Volume Device是挂载时要指定的设备名称,Usage和Mountpoint仅仅是描述,并不是表明其真正用途和真正的挂载点。
–可以使用asmcmd volset来修改usagestring和mountpath。

$ asmcmd volinfo -G ACFSDG -a
Diskgroup Name: ACFSDG

         Volume Name: ACFSDGVOL1
         Volume Device: /dev/asm/acfsdgvol1-57
         State: ENABLED
         Size (MB): 204800
         Resize Unit (MB): 256
         Redundancy: UNPROT
         Stripe Columns: 4
         Stripe Width (K): 128
         Usage: To Store RMAN backupsets
         Mountpath: We should mount this volume as /backup

–检查ACFS挂载点,可以看到当前Mount Point并不是/backup而是/acfsmounts/acfsdg_acfsdgvol1,后面我们就要修改这个挂载点。

# acfsutil registry -l /dev/asm/acfsdgvol1-57
Device : /dev/asm/acfsdgvol1-57 : Mount Point : /acfsmounts/acfsdg_acfsdgvol1 : Options : none : Nodes : all : Disk Group : ACFSDG : Volume : ACFSDGVOL1 

–创建新的挂载点

# mkdir /backup

–先尝试用asmcmd volresize命令修改卷大小,报ORA-15476错误,实际上这里的意思是说,在卷处于mount状态时,是无法用volresize命令修改卷大小的,必须用acfsutil size命令。volresize命令只能在文件系统被卸载之后才能使用。

ASMCMD> volresize -G acfsdg -s 614400M ACFSDGVOL1
ORA-15032: not all alterations performed
ORA-15476: ACFS volumes must be resized with the 'acfsutil size' operating system command. (DBD ERROR: OCIStmtExecute)

–卸载当前已经挂载的文件系统

# umount -a -t acfs

–修改ACFS Registry,修改这个信息并不会自动挂载文件系统,而只是为了让下次Oracle Clusterware重启的时候可以自动地将文件系统挂载到正确路径下。

# acfsutil registry -d /dev/asm/acfsdgvol1-57
acfsutil registry: successfully removed ACFS volume /dev/asm/acfsdgvol1-57 from Oracle Registry
# acfsutil registry -a /dev/asm/acfsdgvol1-57 /backup
acfsutil registry: mount point /backup successfully added to Oracle Registry
# acfsutil registry -l /dev/asm/acfsdgvol1-57
Device : /dev/asm/acfsdgvol1-57 : Mount Point : /backup : Options : none : Nodes : all : Disk Group : ACFSDG : Volume : ACFSDGVOL1

–在文件系统被卸载之后,尝试使用volresize命令修改大小。报ORA-15041错误,因为我们尝试指定之前在asmcmd lsdg命令中显示的该磁盘组的Total_MB,但是由于ADVM Volume在创建时会有额外的空间开销,因此报空间不足。当然,如果这里我们将大小降低1G左右,volresize命令是可以运行成功的。本例中在后面选择使用acfsutil size来修改大小。

$ asmcmd volresize -G acfsdg -s 614400M ACFSDGVOL1
ORA-15032: not all alterations performed
ORA-15041: diskgroup "ACFSDG" space exhausted (DBD ERROR: OCIStmtExecute)

–手动挂载文件系统到新目录下。

# mount -v -t acfs /dev/asm/acfsdgvol1-57 /backup
mount.acfs: volume: /dev/asm/acfsdgvol1-57, mount point: /backup
mount.acfs: options: rw
mount.acfs: verbose option specified
mount.acfs: command string: /bin/mount -i -t acfs -o ,rw /dev/asm/acfsdgvol1-57 /backup -v.
/dev/asm/acfsdgvol1-57 on /backup type acfs (rw)

–修改挂载点属主

# chown oracle:oinstall /backup 

–acfsutil size命令可以在文件系统仍然被使用的时候进行扩容,+/-符号表示要在当前基础上增加或者减少多少,这比volresize命令更灵活。

# acfsutil size +400000M /backup
acfsutil size: new file system size: 634312982528 (604928MB)
# acfsutil size +8000M /backup
acfsutil size: new file system size: 642902917120 (613120MB)
# acfsutil size -3000M /backup
acfsutil size: new file system size: 639950127104 (610304MB)
How to create ASM filesystem(ACFS) in Oracle 11gR2

本文描述如何创建ACFS文件系统,前提要求:
1. Oracle 11gR2数据库。
2. 如果是11.2.0.1数据库那么操作系统只支持Linux和Windows,如果是11.2.0.2数据库那么增加支持的操作系统有AIX和Solaris。
3. 已经安装Grid Infrastructure,单机即可(但是ACFS在Oracle Restart环境中会有些限制,详见【备注1】)。
4. 已经创建了ASM实例以及ASM磁盘组,实例中ASM实例名为+ASM,磁盘组为ORADG。

[sourcecode language=”sql”]SQL> alter diskgroup oradg add volume acfsvol size 1G;
alter diskgroup oradg add volume acfsvol size 1G
*
ERROR at line 1:
ORA-15032: not all alterations performed
ORA-15221: ASM operation requires compatible.asm of 11.2.0.0.0 or higher[/sourcecode]

如上的错误表示如果要在ASM磁盘组上创建ACFS Volume,必须要求ASM磁盘组的属性COMPATIBLE.ASM在11.2以上。
如果ASM磁盘组是使用asmca图形化工具创建的,那么compatible.asm默认设置就已经为11.2,但如果是使用CREATE DISKGROUP这个SQL命令创建的,那么默认设置则为10.1,需要手动修改。

[sourcecode language=”sql” toolbar=”false”]SQL> alter diskgroup oradg set attribute ‘COMPATIBLE.ASM’=’11.2’;[/sourcecode]

如果要创建ACFS Volume,还必须要求ASM磁盘组的COMPATIBLE.ADVM属性也在11.2以上,此属性默认为空。

[sourcecode language=”sql”]SQL> alter diskgroup oradg set attribute ‘compatible.advm’=’11.2’;
alter diskgroup oradg set attribute ‘compatible.advm’=’11.2’
*
ERROR at line 1:
ORA-15032: not all alterations performed
ORA-15242: could not set attribute compatible.advm
ORA-15238: 11.2 is not a valid value for attribute compatible.advm
ORA-15477: cannot communicate with the volume driver

SQL> host oerr ora 15477
15477, 00000, "cannot communicate with the volume driver"
// *Cause: An attempt was made to communicate with the volume driver.
// *Action: Check that the ASM volume driver is loaded. If so, check the alert
// log to identify the reason for failure and take necessary action
// to prevent such failures in the future.
//[/sourcecode]

如上的错误表示ASM volume driver没有加载。需要使用root用户手工加载。

# /app/grid/bin/acfsload start -s

然后再次修改ASM磁盘组的COMPATIBLE.ADVM属性,并创建ACFS Volume。

[sourcecode language=”sql”]SQL> alter diskgroup oradg set attribute ‘compatible.advm’=’11.2′;

Diskgroup altered.

SQL> alter diskgroup oradg add volume acfsvol size 1G;

Diskgroup altered.

SQL> select VOLUME_DEVICE from V$ASM_VOLUME where VOLUME_NAME=’ACFSVOL’;

VOLUME_DEVICE
——————————————————————————–
/dev/asm/acfsvol-351[/sourcecode]

创建并注册文件系统,然后使用mount.acfs命令挂载文件系统,以下命令需要用root用户执行。

# mkdir -p /app/oracle/acfsmounts/oradg_acfsvol 
# /sbin/mkfs -t acfs -n ACFSVOL1 /dev/asm/acfsvol-351
mkfs.acfs: version                   = 11.2.0.1.0.0
mkfs.acfs: on-disk version           = 39.0
mkfs.acfs: volume                    = /dev/asm/acfsvol-351
mkfs.acfs: volume size               = 1073741824
mkfs.acfs: Format complete.
# /sbin/acfsutil registry -a -f /dev/asm/acfsvol-351 /app/oracle/acfsmounts/oradg_acfsvol
acfsutil registry: mount point /app/oracle/acfsmounts/oradg_acfsvol successfully added to Oracle Registry
# mount.acfs -o all
#df -k | grep acfs
/dev/asm/acfsvol-351   1048576     39192   1009384   4% /app/oracle/acfsmounts/oradg_acfsvol
# chown oracle:dba /app/oracle/acfsmounts/oradg_acfsvol 

创建成功以后,可以用oracle用户在该文件系统下创建测试文件。

$ dd if=/dev/zero of=/app/oracle/acfsmounts/oradg_acfsvol/testfile bs=8192 count=100
100+0 records in
100+0 records out
819200 bytes (819 kB) copied, 0.0270009 seconds, 30.3 MB/s
$ ls -l /app/oracle/acfsmounts/oradg_acfsvol/testfile
-rw-r--r-- 1 oracle dba 819200 Aug 12 19:18 /app/oracle/acfsmounts/oradg_acfsvol/testfile

查看ACFS文件系统信息。

# /sbin/acfsutil info fs 
/app/oracle/acfsmounts/oradg_acfsvol
    ACFS Version: 11.2.0.1.0.0
    flags:        MountPoint,Available
    mount time:   Thu Aug 12 19:06:33 2010
    volumes:      1
    total size:   1073741824
    total free:   968667136
    primary volume: /dev/asm/acfsvol-351
        label:                 ACFSVOL1
        flags:                 Primary,Available,ADVM
        on-disk version:       39.0
        allocation unit:       4096
        major, minor:          252, 179713
        size:                  1073741824
        free:                  968667136
        ADVM diskgroup         ORADG
        ADVM resize increment: 268435456
        ADVM redundancy:       unprotected
        ADVM stripe columns:   4
        ADVM stripe width:     131072
    number of snapshots:  0
    snapshot space usage: 0

在ASM卷被打开的时候,无法直接shutdown ASM实例,会报ORA-15487错误。

[sourcecode language=”sql” toolbar=”false”]SQL> shutdown immediate
ORA-15487: cannot shutdown the ASM instance with an open ASM volume[/sourcecode]

可以使用umount命令卸载ACFS文件系统。

# /bin/umount -t acfs -a

如果挂载文件系统时报错,那么可能是因为ACFS Volume没有激活,Volume的状态可以从V$ASM_VOLUME.STATE字段获得,显示为“ENABLED”才表示已激活。

# mount.acfs /dev/asm/acfsvol-351 /app/oracle/acfsmounts/oradg_acfsvol
mount.acfs: CLSU-00100: Operating System function: open64 (/dev/asm/acfsvol-351) failed with error data: 2
mount.acfs: CLSU-00101: Operating System error message: No such file or directory
mount.acfs: CLSU-00103: error location: OOF_1
mount.acfs: ACFS-02017: Failed to open volume /dev/asm/acfsvol-351. Verify the volume exists.

如果Volume状态显示为DISABLE,可以使用如下命令,激活Volume。
[sourcecode language=”sql” toolbar=”false”]SQL>alter diskgroup ORADG enable volume ‘ACFSVOL’;[/sourcecode]

本文创建使用的是SQL命令行方式创建ACFS卷,用asmcmd也可以完成,可以参看官方文档 | Surachart的文章

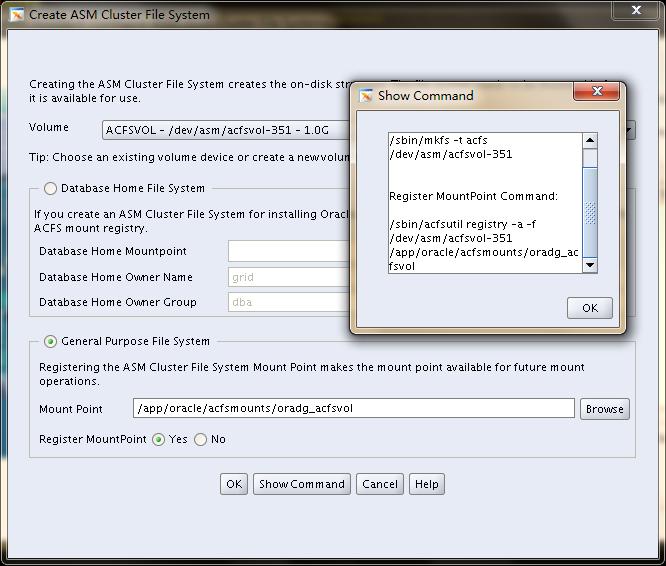
而如果选用图像化界面的话,可以用asmca或者OEM来完成,下图是asmca界面,在其中查看命令行写法也很方便。

【备注1】
在当前版本的Oracle Restart环境(也就是Standalone Grid Infrastructure)中,以下操作不会自动运行。
1. 加载Oracle ACFS drivers
2. 加载存在于ACFS mount registry中的Oracle ACFS文件系统

应对于第一个问题,我们可以通过以下方法让操作系统在启动的时候自动加载Oracle ACFS drivers。

创建/etc/init.d/acfsload文件,让其在操作系统启动时自动运行。

# cat /etc/init.d/acfsload
#!/bin/sh
# chkconfig: 2345 30 21
# description: Load Oracle ACFS drivers at system boot
/app/grid/bin/acfsload start -s

# chmod u+x /etc/init.d/acfsload
# chkconfig --add  acfsload
# chkconfig --list  acfsload   
acfsload        0:off   1:off   2:on    3:on    4:on    5:on    6:off

对于第二个问题,由于ACFS文件系统能够正确加载,必须要求ASM实例启动成功,并且相应的ASM磁盘组正确加载,这份依赖性在集群环境中是通过创建Oracle ACFS registry resource (ora.registry.acfs)来实现的,但是在Standalone环境中,我们无法保证这份依赖性,因此只能通过创建以下脚本用root用户手动挂载ACFS文件系统(如果你们有更好的方法请告诉我)。

# cat /usr/local/sbin/mountacfs 
su - grid -c "asmcmd volenable -G oradg -a"
mount.acfs -o all

How to resolve ORA-15025 when creating ASM diskgroup on Solaris

操作系统版本:Solaris10 Sparc 64bit
数据库版本:Oracle 10.2.0.4

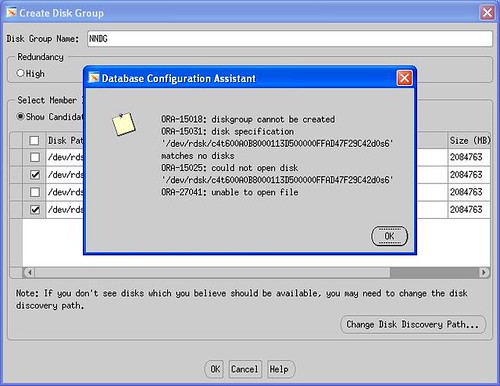
在创建ASM Diskgroup的时候出现如下图报错。

creating ASM diskgroup on Solaris10

检查当前系统裸设备的设置。

partition> p
Current partition table (original):
Total disk cylinders available: 53154 + 2 (reserved cylinders)

Part      Tag    Flag     Cylinders         Size            Blocks
  0       root    wm       0                0         (0/0/0)              0
  1       swap    wu       0                0         (0/0/0)              0
  2     backup    wu       0 - 53153        1.99TB    (53154/0/0) 4269595050
  3 unassigned    wm       0                0         (0/0/0)              0
  4 unassigned    wm       0                0         (0/0/0)              0
  5 unassigned    wm       0                0         (0/0/0)              0
  6        usr    wm       0 - 53153        1.99TB    (53154/0/0) 4269595050
  7 unassigned    wm       0                0         (0/0/0)              0

注意到被使用的裸设备d0s6的扇区划分是从0开始的,这在Solaris操作系统中将会导致Oracle无法读取该裸设备,因此引发了上面的错误。

解决方法是分配出一小部分空间给其它分区。比如分配100M给d0s3。

partition> p
Current partition table (unnamed):
Total disk cylinders available: 53154 + 2 (reserved cylinders)

Part      Tag    Flag     Cylinders         Size            Blocks
  0       root    wm       0                0         (0/0/0)              0
  1       swap    wu       0                0         (0/0/0)              0
  2     backup    wu       0 - 53153        1.99TB    (53154/0/0) 4269595050
  3 unassigned    wm       0 -     2      117.66MB    (3/0/0)         240975
  4 unassigned    wm       0                0         (0/0/0)              0
  5 unassigned    wm       0                0         (0/0/0)              0
  6        usr    wm       3 - 26112     1000.06GB    (26110/0/0) 2097285750
  7 unassigned    wm       0                0         (0/0/0)  

再次重新创建ASM磁盘组,成功。