How to resolve setlocale warning in OEL6

默认安装的Oracle Enterprise Linux 6,在用户登录以后,通常会有以下警告:

Last login: Tue Jun 19 16:52:19 2012 from 192.168.2.1
-bash: warning: setlocale: LC_CTYPE: cannot change locale (UTF-8)

并且在执行oerr等命令的时候,也会先产生警告,比如:

$ oerr ora 10046
perl: warning: Setting locale failed.
perl: warning: Please check that your locale settings:
	LANGUAGE = (unset),
	LC_ALL = (unset),
	LC_CTYPE = "UTF-8",
	LANG = "en_US.UTF-8"
    are supported and installed on your system.
perl: warning: Falling back to the standard locale ("C").
10046, 00000, "enable SQL statement timing"
// *Cause:
// *Action:

其实也并不太影响使用,但是比较烦躁。

解决方法:

vi /etc/sysconfig/i18n

默认的内容可能是:

LANG="en_US.UTF-8"
SYSFONT="latarcyrheb-sun16"

需要添加一行LC_ALL的设置,如下:

LANG="en_US.UTF-8"
LC_ALL="en_US.UTF-8"
SYSFONT="latarcyrheb-sun16"

再重新登录,就一切OK了。

备注:为什么会有i18n这样古怪名字的配置文件,实际上i18n是internationalization的所写,表示从i到n之间有18个字母。

How to use iperf to test network bandwith

测试Linux机器之间的网络互联带宽,有一个很简单的工具,iperf

下载的是源码,编译过程如下:

./configure
make
make install

安装完毕以后,iperf的路径:

# which iperf
/usr/local/bin/iperf

然后在需要测试的两台Linux机器上,一台启动服务器模式。

# iperf -s
------------------------------------------------------------
Server listening on TCP port 5001
TCP window size: 85.3 KByte (default)
------------------------------------------------------------

另外一台启动客户端模式,其中IP地址为启动服务器模式的机器的IP,稍等片刻,即可出现测试结果。

# iperf -c 192.168.0.19
------------------------------------------------------------
Client connecting to 192.168.0.19, TCP port 5001
TCP window size: 16.0 KByte (default)
------------------------------------------------------------
[  3] local 192.168.0.18 port 16265 connected with 192.168.0.19 port 5001
[ ID] Interval       Transfer     Bandwidth
[  3]  0.0-10.0 sec   114 MBytes  95.5 Mbits/sec

同时,启动服务器模式的机器上也会显示:

[  4] local 192.168.0.19 port 5001 connected with 192.168.0.18 port 16265
[ ID] Interval       Transfer     Bandwidth
[  4]  0.0-10.1 sec   114 MBytes  94.9 Mbits/sec

可知,这两台机器之间的互联带宽仅仅达到百兆网的速度。

How to Install apk to Android Devices from Mac OS X

在Mac OS X中我们可以使用Android SDK直接将下载到电脑中的apk文件安装到Android设备中。

1. 下载Android SDK,可以从Android Developers网站直接下载,也可以通过MacPorts安装。我采取后一种方式。

$ sudo port install android
Password:
--->  Fetching archive for android
--->  Attempting to fetch android-16_0.darwin_11.x86_64.tbz2 from http://packages.macports.org/android
--->  Fetching android
--->  Attempting to fetch android-sdk_r16-macosx.zip from http://dl.google.com/android
--->  Attempting to fetch android-appbundles-r89422.tar.gz from http://distfiles.macports.org/android
--->  Verifying checksum(s) for android
--->  Extracting android
--->  Configuring android
--->  Building android
--->  Staging android into destroot
--->  Installing android @16_0
--->  Activating android @16_0
--->  Cleaning android

然后通过port contents命令可以获知Android SDK的安装路径。在我的机器上是/opt/local/share/java/android-sdk-mac_x86。

$ port contents android
Port android contains:
  /Applications/MacPorts/Developer/.localized
  ......
  /opt/local/share/java/android-sdk-mac_x86/tools/adb_has_moved.txt
  /opt/local/share/java/android-sdk-mac_x86/tools/android
  ......

默认安装的Android SDK是没有adb命令(该命令用于安装apk程序)的,需要运行Android SDK and AVD Manager来进行额外的下载安装。

2. 安装SDK Platform-tools

cd /opt/local/share/java/android-sdk-mac_x86/tools
sudo ./android

会显示以下界面,在第一次运行的时候,Android SDK Platform-tools的状态是未安装的,因此我们需要选中该组件,然后点击右下方的“Install packages”按钮。而此处的截图是安装完毕以后的情况。
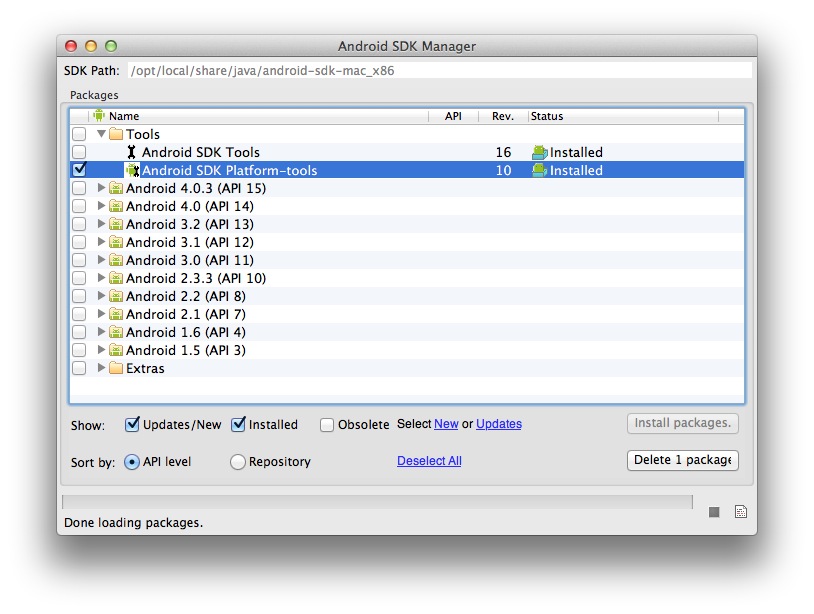
3. 安装apk软件,当然,这里先要用数据线将Android设备连接到Mac电脑上。

##adb命令是安装到platform-tools目录中,而非上一步android命令所在的tools目录。
cd /opt/local/share/java/android-sdk-mac_x86/platform-tools
##先探测是否可以正确识别设备,有设备号和device字样表示正确识别。 ./adb devices
List of devices attached 
01839c14	device
##安装apk软件,本例中安装的是高德移动导航
$ ./adb install /tmp/Autonavi_v1.2.apk
3225 KB/s (4027409 bytes in 1.219s)
	pkg: /data/local/tmp/Autonavi_v1.2.apk
Success